How to Store and Grow Seeds from Alchemy Works
Storing seeds: Store seeds in a small covered glass jar in the refrigerator; you can keep them in paper packets in there (NOT thick plastic). Keep them dry. One way to ensure dryness is to use a silica gel pack, like you can get from craft stores. You can also use a tablespoon or so of instant dried milk in a coffee filter to absorb moisture in the jar. Another good dessicator is the white crystal kitty litter wrapped in a paper towel or a coffee filter. Seeds kept cool and dry will remain viable for a couple years, although tropical seeds are sometimes very short-lived and only last a few months, if that. When you want to take some seeds out of storage, let the jar or whatever you've got them in come to room temp before opening it; that keeps condensation from forming on your seeds. Moisture and warmth are what you want for germination, but they are hell on seed storage; you want cold and dry. When you are ready to plant, you can test for keepers by putting the seeds to soak in water overnight. Throw out the ones that are floating after 24 hours.
A word about seeds in a can. Regarding bulk open-pollinated seeds put up with oxygen-absorbers and whatnot for long-term seed storage in case of an emergency: Don't waste your money. For one thing, a problem with open pollinated vegetable seed is that various varieties are NOT typically kept true by big seed companies (from which most small seed companies buy their seeds). I've had the experience of buying, for instance, De Cicco broccoli seed, an old OP variety, and planting them to have mostly weird garbage crosses grow instead of De Cicco. This is not uncommon. The fact is that there is little money in preserving the purity of open-pollinated seed lines. Only a few companies do this. And what are you going to do about it, ten years down the line, when you find out that the seeds you bought were from stocks that were not kept pure? Ask for your money back? For another, seeds denied oxygen can become deeply dormant. This means that although they might be alive, they will not germinate without extreme measures like two-year waits, the use of sulfuric or giberrelic acid, etc. This is not what you want from a vegetable seed, which should be very easy to germinate. This means that foil packs and oxygen absorbers and thick plastic are not a good idea for seed storage. Finally, if you are not growing veggies every single year, then you are not suddenly going to know how to grow them in ten years. Gardening is more art than science. Learn how to grow seeds NOW, even if you have only pots to work with. Find varieties that grow well in your conditions and that you like the taste of. Don't buy seeds of things you never eat just because they sound wholesome. Do your best to learn how to collect your own seeds. Study Suzanne Ashworth's Seed to Seed book for veggies--don't just start collecting things. Seed-saving is a skill that must be learned to be done right. Otherwise, you can end up saving junk (squash, for instance). People who want to sell you seeds in a can are playing off your fears. Be a gardener, not a dupe. It is SKILL that will get you through hard times, not STUFF. Top
Planting by the Moon
|
|
Waxing (right-hand side of Moon is lit): |
Growing wild plants. Most of the seeds I offer are of wild plants that although they have a long association with people have not necessarily been cultivated on a regular basis. That means that they retain their wild characteristics, including germinating irregularly. Hybrids and long-cultivated plants like wheat or petunias when planted will all germinate at once. This is not so with wild plants. Irregular germination is beneficial in the wild, where conditions might not be right for the plant; it therefore spreads out its chances of hitting a good time to grow. But this same feature can try the patience of gardeners. Just know that the seeds of perennials and herbs are not as regimented in their behavior as those of hybridized plants.
Throwing seeds on the ground: Please realize that throwing seeds on the ground, whether it is prepared or not, is not a good way to try to germinate them, especially when it comes to perennials. The vast majority of the seeds will die from too much moisture, too much heat, too much cold, too much sun, and/or uneven watering. The rest will be eaten by birds, animals, and insects. The few live ones that remain might well bide their time for several years before germinating. They will also have to compete with the thousands of weed seeds that exist in soil, and they will most likely lose that competition. There are a lot of methods for germinating seeds - cold stratification, cold-water soaking, the baggie method, starting in peat pellets or cellpaks under shoplights, etc. All of the successful methods involve care and are fiddly. Fiddlyness is part of gardening. As the saying goes, nothing worth doing is easy. Top
Breaking dormancy. Some seeds are very protective of their life force and will not easily break dormancy. They have to be convinced that the time is right for them to sprout. Humans have found various ways to do that. Stratification is one of them. In this method, the seeds are put into a cold, moist environment. You can do this by planting them in peat pellets, or mixing them with a little moist sand in a baggie, or using the baggie method popularized by Norm Deno. Wet and wring out a paper towel (I like to use a weak solution of water and liquid kelp to help germinaton).
|
|
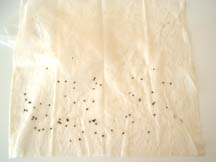
Sow the seeds on half or a quarter of the paper towel. I usually get carried away. As Oscar Wilde said, "Nothing succeeds like excess." |
|
|
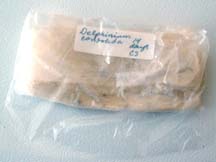
Fold it up and put it into a baggie. The cheap, thin baggies work best. You want a little oxygen to get through. Don't seal it. Just fold it closed. Don't forget to label with the name of the seed and the date you started them. Then store either out of sunlight for room temperature germinators, on a heating pad for seeds that need warmth, like datura, or for seeds that need a winter, in the fridge or try the Outdoor Treatment. Check for germination every day or so once the time is up. Carefully put the roots in soil, holding the seed by the shell, once they germinate. Don't touch the root. |
|
|
Really tiny seeds that need to be surface sown to germinate can be sprinkled on the paper towel, put in the baggie, and then left in a bright place (but no direct sun). Check for germination regularly. When you start to see them germinating, gently unfold the towel and tear it apart (or cut it into small squares, which is more efficient). Then gently press the towel onto wet potting soil and put the pot into an open baggie until the seedlings catch in the soil. The towel will disintegrate, as you can see in the pic of mint seedlings. Take the pot out of the baggie once the seeds have established themselves so you don't get damping off. |
Soaking seeds in cold water that is changed for fresh daily also helps some seeds--I have found this helpful for belladonna, nightshade, mandrake, and henbane, and I am trying it on aconite now to see if it will help speed that laggard up (it helped with variegated aconite, but not the others). Cold stratification convinces the seed that it has gone through winter and it is okay to germinate when you remove them from the fridge.
Other ways to help a seed break dormancy involve using chemicals that gnaw off the seed's protective coating. Some that work are hot water, vodka, or gibberelic acid. Some plants even need fire to germinate. I've indicated which are necessary. Top
Moon Stuff:
First Quarter: From
New Moon to the Half, plant annuals or crops that will be harvested for
their tops and that don't produce what we think of as fruit.
Second
Quarter: From
Half to Full, plant annuals that have seeds inside their fruit.
Third
Quarter: From
Full to Half, plant roots and bulbs, perennials, trees, and shrubs.
Fourth
Quarter:
From Half to New, do other garden chores besides planting, especially
pruning.
Avoid gardening on the full or new moon. Celebrate instead. Find out
which
phase the Moon is in. Top
General planting info: Plant on a full stomach, so your garden will be full. Each person has a plant family that is especially close to them. Do your best to discover and grow that family and then trade with friends for plant products in other families.
Jiffy-7 and Kelp. I have had the best luck using Jiffy-7 pellets and liquid kelp solution to start seeds. Jiffy-7 pellets are compressed peat moss inside a fibrous cylinder that will puff up as it absorbs water. They're available at garden centers very cheaply. Get a small plastic "flat" while you are there to put them in (although a cake pan, disposable aluminum roasting pan, or plastic dishware from microwave meals will also work). Liquid kelp is an 200:1 extract of kelp seaweed that is available from in big-box home supply centers and garden companies that concentrate on organics (Maxicrop Liquid Seaweed is a popular brand); check the web. (I have not worked with regular dried kelp because it is hard to wet and weak in comparison to the extract.) It is expensive--perhaps $12 for a small bottle--but usually 1/4-1/2 teaspoon is mixed with a gallon of water, so a little goes a long, long way. Mix the kelp extract with water in the proportions the label indicates, and soak the pellets in the solution. They will puff up.
However, other people use other methods. Some prefer to use a sterile potting soil or vermiculite to start seedings in flats and then "prick out" the babies when they come up and put them in separate pots. This does allow you to choose the biggest seedlings to pot up and you don't waste pots on dud seeds, but it is a fiddly business.Top .
Planting . When the pellets are thoroughly soaked, put them in the flat. Poke a very shallow hole in the top of the pellet with your finger tip. Sometimes they come with holes already in them, and these are usually too deep. Use the size of the seed to gauge the size of the hole. A small seed like a poppy seed should just very barely be covered by soil. I'd put about a flat dime's worth of soil over most seeds. Larger seeds can take more; We never usually put our seeds very far down into the soil, maybe about a quarter inch. Really tiny seeds usually shouldn't even be covered, just pressed lightly down. Planting too deep is the number one cause of non-germination. The second is watering too much. Only plant half of your seeds. That way, if something goes wrong, you will have more left to try again. Also, sowing too thickly can result in damping off, because the seedlings don't get enough air circulation. Sow sparsely. With very tiny seeds, take a pinch between your fingers and gently rub your fingers together over the top of the planting soil. The little seeds with be sprinkled over it. Go slowly so you don't overseed. Most seed packets have way too much seed in them to use in one year, so save it for next year.Top .
Heat. If the plant is tropical or if you're growing the seeds in a cold room, they might benefit from bottom heat. Instead of spending a lot for a bottom heater (about $50 last time I looked), you can use a water-resistant heating pad from Wally World. Take the cloth cover off and put the pad under (not in) the flat or pan with the seed babies in it, and set it on Medium. (Make sure the flat doesn't have any holes in it). You can also use a heating pad to pregerminate seeds sown in moist paper towels and stored in baggies. Just make sure your cat doesn't lie on top of it, like mine does. Top .
Water. Seeds shouldn't be allowed to dry out, but at the same time they cannot be sopping wet or they might rot or get fungus ("damping off"--the tiny seedlings suddenly all fall over and die). It's a balance you have to learn for yourself. Some people mist their seeds, but I have better luck bottom watering them. This means you put the water (water and liquid kelp, in this case) into the bottom of the pan instead of on the pellets themselves. The pellets will draw up as much water as they need. Dump out water they don't absorb. Pouring the water on the pellets can dislodge the seeds or seedlings. You can cover the seeds with a plastic cover, the kind that come with some flats, or you can use a plastic bag from the grocery store. Keep an eye on it so that it doesn't get too hot or stale in there. If you live in a humid area, this isn't necessary. Top .
Identification. Most seeds will first produce two leaves that do not have the shape of their normal leaves. In fact, seedlings all look pretty much the same until they get their second pair of leaves--their true leaves--and then you can tell them apart by leaf shape. Top .
Strengthening. Once the seeds are up, you can get them to grow a little stronger by using a very gentle fan on them. This will give them stronger stalks. It will also dry them out faster, though, so keep an eye on that (although this can be helpful if you've got a heavy hand with the watering can). You can also just lightly brush your hand over the tops every day, like you would over a short haircut. I believe this also helps to build communication with the plant. Top .
Sun. In terms of sun, most seeds do not need sun to start growing. Consider how they grow out in the wild--under the leaves of other already-established plants. Putting them on a counter near a window without direct sunlight is good. Or you can use shoplights (no need to have fancy growlights to germinate or grow seedlings). Once the seedlings are up, you should get them used to the sun a little at a time or they will die. If you have covered them with plastic, uncover them at this point. Putting them in the sun with a cover on will bake the poor guys. Start them out with 1/2 hour of sun a day and work your way up. Putting them on a porch is good, if it's not too cold outside. Top .
Damping Off. Sometimes seedlings will just up and keel over all at once, or they will develop a very skinny spot on their stem and slowly die. This is called "damping off" and is caused by fungus, which is in turn caused by too much water, not enough air circulation, or seedlings growing too thickly. Using diluted liquid kelp solution to water seedlings helps keep down damping off, but many people have also had success with using chamomile tea. They make a very strong tea of 1/4 chamomile to 1 cup boiling water. Let it cool and strain. Then wash the seeds before planting or spray on seeds and soil when they get fungus (sometimes shows as white spots on the soil). Make small amounts of the tea, because it does not store long, only a few days. Thanks to Raven for this tip! Anyone who has ever grown seeds has had experience with damping off. This is one of the major reasons why you should keep back some of the seeds in each packet.
Going outside ("hardening off"). Once the plant starts to get true leaves (as opposed to the first two leaves that come out), you can begin putting them outside for a little while each day, depending on how cold it is out. Keep them out of direct sunlight outside until they are good and tough. Just keep in mind, again, how they would be growing on their own--gradually working their way up in between the leaves of established plants, making their way to the sun little by little, and keeping warm under the leaves of other plants, which would hold the warmth of the earth in and frost off. I usually start mine off on a porch outside, where they get no direct sunlight. Then I put them in morning sun starting with 1/2 hour per day. You can tell if they want more or less by the way they react to it. If they get leggy (stalks are long), they need more sun. Top .
Potting up. When you start to see roots coming out of the sides or bottoms of the pellets, you will know it is time to pot them up. Get some good quality potting soil and put the pellets in a pot about a finger's width bigger on all sides. Putting them in a too-big pot might mean trouble with watering (too much water too far below the roots means a good home for fungus). A good way to gauge the size of the pot once the plant gets going is that the pot's height should be 1/3 the height of the plant. I often use plastic cups for pots for seedlings. Stamp a hole in the bottom with a Philips screwdriver or nail. Be careful not to crack it, although if you do, it's still usable--will just drain fast. Tamp down soil in pot lightly and make sure you do not cover up any portion of the stem, or it will rot. However, do cover up the edges of the Jiffy-7, because some people believe leaving the peat exposed wicks out moisture. Top .
Transplanting. Once you get the plant to a certain point and the weather is warm enough, you will be able to plant it directly outside, if that's what you want. Choose a spot where you have prepared the soil by digging a small hole and putting in compost. Many people advise double-digging, using a tiller, and all that. These are methods good for growing crops but overkill for growing herbs. The important thing is not to allow the herb to compete with grass. One method that works for me is to cover the area I am intending to use as a garden with cardboard from boxes (put some mulch over the cardboard so it doesn't blow away and so it looks nice). Allow at least a month to go by for the grass underneath to die. Then push back the mulch and cut out holes where you want plants to go. Dig out the dirt in those holes and replace it with good potting soil and composted cow manure (be careful to use only Black Cow--I have found other types of so-called composted cow manure is not composted but only deodorized, and it will kill any plant it is put near. Other composted manures, worm castings, or mushroom compost might be a better bet if you cannot find Black Cow). Plant your plants in that.
Water a freshly potted or planted seedling thoroughly (called "muddying in") so that the roots take well. Again, make sure not to cover up the stem of the plant and do not tamp in the soil around the plant too heavily. Tuck plenty of soil in, water thoroughly, and then push more soil into the airpockets that watering shows up. Then cover with a nice mulch of your choice--don't put the mulch too close to your babies. Leave maybe one inch around the stem, so that the only soil that is even a tiny bit exposed is the potting soil. This will keep weed seeds in the soil from germinating. I like cypress or eucalyptus as a mulch. With this method, you never have to weed, and you don't have to buy any expensive weed barriers. Top .
Fertilizing. Liquid kelp solution and fish emulsion (drives the cats crazy--try the new "unscented" kind) work well as foliar feeding, the only kind of fertilizing I do. Fish emulsion is available from gardening places that sell liquid kelp. Sometimes they come in the same bottle, but kelp on its own is better for starting seedlings. Something in it helps break seed dormancy. Add fish emulsion once the plant is past the toddler stage. Get a pump sprayer at a gardening store, usually about $12, or you can make do with a plastic mister, although these break easily. Mix up a solution according to the package directions. Spray the plants with the solution on the undersides of their leaves in the morning when the birds are singing and the plants have their little mouths open (really). If you are growing inside, you can also play any music that has high, fluty notes to get the plants to open their stomae (feeders) during feeding at other times. They use the foliar fertilizer best if their stomae are open. Spraying regularly helps you keep an eye on the bug situation too. Top
Fall planting of perennial seeds.
Growing inside. If you want to get your plants to flower inside, you need either a very sunny window or grow lights. I have read that the Envirolight is a good, inexpensive light for indoor growing but have not tried it personally. A good place to grow plants in the house is an enclosed sun porch. Plants need lots of air circulation or they will develop problems with fungus, gnats, whiteflies, spider mites, and so on. The air in a house in winter is especially problematic because it is very dry, and plants need humidity. Misting every single day is mandatory to keep your plants in good condition during winter heating. You can buy a mister that attaches to a faucet or use a tank sprayer. Stagnant air should be kept stirring with a light fan; the faint breeze will help keep the plant's stalk strong. Top .
If you have any questions about growing the seeds I sell, just email me.
©
2004-2023 Alchemy Works; No reproduction without permission
Alchemy Works products are offered for use in spiritual, ritual, meditative, and magical practices, not for medicinal purposes. The information on this website is provided for its folkloric, historic, and magical value. It is not intended to be a substitute for professional medical advice, diagnosis, or treatment.